centos创建用户命令
作者:虹銷-雨霽
前言
因工作需要,近期一直在研究LimeSurvey的部署安装。作为一个小白,在安装过程中,遇到了不少问题,也查阅了各种教程,无奈网上的各种教程要么涵盖不全,要么版本老旧,对新手不是很友好。本着我为人人,人人为我的分享精神,趁着正式部署的机会,收集了素材,把我的安装过程记录下来,方便以后自己查阅,也为各位同好提供参考。本教程旨在为初学者提供帮助,把我遇到的各种问题予以呈现并给出解决办法,难免啰嗦,希望各位大佬不要见笑。第一次发文,不妥之处也请大家多多指教。
本文参考了一下文章,对原作者表示感谢。
http://www.vue5.com/centos/22971.html
https://www.cnblogs.com/it-tsz/p/13211464.html
https://www.cnblogs.com/w-j-q/p/14995398.html
LimeSurve简介
LimeSurvey(前身为PHPSurveyor)是一款在线问卷调查程序,它用PHP语言编写并可以使用MySQL,PostgreSQL或者MSSQL等多种数据库,同时它也是一个开源软件,其最新版本的软件包可以完全免费获取和使用。它集成了调查程序开发、问卷的设计、修改、发布、回收和统计等多项功能,使用它,用户不必了解这些功能的编程细节。
LimeSurve官方网站:https://www.limesurvey.org/
LimeSurve部署安装教程
本教程基于CentOS 7.6系统,其他版本可做参考。
本教程假定在一个全新的CentOS系统中进行部署安装,需要安装Mariadb数据库和PHP,如已安装可跳过这两个步骤。
本教程命令需在“root”账户下运行,如果不是,可使用“su”命令提权,或者在命令前添加“sudo”以获取root权限。
首先更新系统版本。
yum clean all
yum -y update
(一)安装Mariadb
1、安装Mariadb
通过yum安装mariadb-server,默认依赖安装mariadb,一个是服务端、一个是客户端。
yum install mariadb-server
出现如下提示时,输入“y”,等待安装完成。
Install 1 Package (+9 Dependent packages)
Total download size: 21 M
Installed size: 110 M
Is this ok [y/d/N]: y
2、配置Mariadb
1)安装完成后首先要把MariaDB服务开启,并设置为开机启动。
systemctl start mariadb
systemctl enable mariadb
出现如下提示时,表示设置成功。
Created symlink from /etc/systemd/system/multi-user.target.wants/mariadb.service to /usr/lib/systemd/system/mariadb.service.
2)首次安装需要进行数据库的配置。
mysql_secure_installatio
3)配置出现的各个选项。
Enter current password for root (enter fornone): # 输入数据库root密码(注意不是系统root密码),第一次安装还没有设置密码,直接回车即可
Set root password? [Y/n] # 设置密码,y
New password: # 输入您的新密码
Re-enter new password: # 再次输入密码
Remove anonymous users? [Y/n] # 移除匿名用户, y
Disallow root login remotely? [Y/n] # 拒绝root远程登录,y
Remove test database and access to it?[Y/n] # 删除test数据库,y
Reload privilege tables now? [Y/n] # 重新加载权限表,y
4)测试是否能够登录成功
mysql -u root -p
Enter password: # 输入数据库root密码
出现 MariaDB [(none)]> 就表示已经能够正常登录使用MariaDB数据库了。
Welcome to the MariaDB monitor. Commands end with ; or g.
Your MariaDB connection id is 8
Server version: 5.5.60-MariaDB MariaDBServer
Copyright (c) 2000, 2018, Oracle, MariaDBCorporation Ab and others.
Type 'help;' or 'h' for help. Type 'c' toclear the current input statement.
MariaDB [(none)]>
5)登录到数据库服务器后,需要创建一个LimeSurvey安装数据库。
CREATE DATABASE limesurvey_db; #创建名为limesurvey_db的数据库
GRANT ALL PRIVILEGES on limesurvey_db.* to 'root'@'localhost' identified by 'YourPassword'; # "YourPassword"更改为您的数据库root密码
FLUSH PRIVILEGES;
exit
(二)安装PHP7
本文写作时,LimeSurve最新版本是5.3.32,需要 PHP 7.2.5 或更高版本。
1、更改yum源
CentOS的yum源不存在php7.x,我们首先要更改yum源。
rpm -Uvh https://dl.fedoraproject.org/pub/epel/epel-release-latest-7.noarch.rpm
rpm -Uvh https://mirror.webtatic.com/yum/el7/webtatic-release.rpm
如果出现以下错误,需要配置dns。
//curl: (6) Could not resolve host: mirror.webtatic.com; Unknown error
//error: skipping https://mirror.webtatic.com/yum/el7/webtatic-release.rpm - transfer failed
1)打开文件/etc/resolv.conf:
vi /etc/resolv.conf
2)输入“i”添加以下内容:
nameserver 8.8.8.8
3)输入“:wq”保存并退出编辑。
4)重启网卡。
systemctl restart network
2、安装PHP7
1)查看目前能够安装的PHP版本
yum list php*
可以看到可安装的PHP最新版为:php72w。
2)安装php72w
yum -y install php72w
3)安装拓展
yum install php72w-common php72w-fpm php72w-opcache php72w-gd php72w-mysqlnd php72w-mbstring php72w-pecl-redis php72w-pecl-memcached php72w-devel
上述命令一共会安装30个拓展包,安装过程较慢,请耐心等待。
安装的拓展包如下:
php-api, php-bz2, php-calendar, php-ctype, php-curl, php-date, php-exif, php-fileinfo, php-filter, php-ftp, php-gettext, php-gmp, php-hash, php-iconv, php-json, php-libxml, php-openssl, php-pcre, php-pecl-Fileinfo, php-pecl-phar, php-pecl-zip, php-reflection, php-session, php-shmop, php-simplexml, php-sockets, php-spl, php-tokenizer, php-zend-abi, php-zip, php-zlib
4)查看PHP版本
php -v
显示如下信息,说明php72w开发环境基本安装完成。
PHP 7.2.34 (cli) (built: Oct 1 2020 13:37:37) ( NTS )
Copyright (c) 1997-2018 The PHP Group
Zend Engine v3.2.0, Copyright (c) 1998-2018 Zend Technologies
with Zend OPcache v7.2.34, Copyright (c) 1999-2018, by Zend Technologies
5)重启httpd服务,并设置为开机启动。
systemctl restart httpd.service
systemctl enable httpd.service
出现如下提示时,表示设置成功。
Created symlink from /etc/systemd/system/multi-user.target.wants/httpd.service to /usr/lib/systemd/system/httpd.service.
6)安装httpd服务
如果执行重启httpd服务出现以下提示,说明没有安装httpd服务。
Failed to restart httpd.service: Unit notfound.
如果没有安装,则执行下面命令进行安装。
yum install httpd -y
启动httpd服务,并设置为开机启动。
systemctl start httpd.service
systemctl enable httpd.service
(三)安装LimeSurvey
1、下载最新版LimeSurvey
首先要做的是去LimeSurvey的下载页面,查看最新的稳定版本的LimeSurvey CE的下载链接,并使用wget命令下载。
LimeSurvey下载页面:https://community.limesurvey.org/downloads/
wget https://download.limesurvey.org/latest-stable-release/limesurvey5.3.32+220817.zip #加粗文字可换为最新的下载链接
将LimeSurvey存档解压缩到服务器上的文档根目录。
unzip limesurvey5.3.32+220817.zip #加粗文字需更换为下载的实际文件名
如果提示以下内容,说明未安装uzip。
-bash: uzip: command not found
安装uzip。
yum install unzip
移动limesurvey文件夹。
mv limesurvey /var/www/html/
更改文件夹权限。
chown apache:apache -R /var/www/html/limesurvey/
2、配置Apache Web服务器
为您的LimeSurvey网站创建Apache虚拟主机。首先使用文本编辑器创建"/etc/httpd/conf.d/vhosts.conf"文件。
vi /etc/httpd/conf.d/vhosts.conf
输入以下内容:
IncludeOptional vhosts.d/*.conf
保存并关闭文件。接下来,创建虚拟主机。
mkdir /etc/httpd/vhosts.d/
vi /etc/httpd/vhosts.d/yourdomain.com.conf #“yourdomain.com”更换为您的域名
输入以下内容:
ServerAdmin [email protected]
DocumentRoot /var/www/html/limesurvey/
ServerName www.yourdomain.com #“www.yourdomain.com”更换为您的域名
ErrorLog /var/log/httpd/www.yourdomain.com -error_log #“www.yourdomain.com”更换为您的域名
CustomLog /var/log/httpd/www.yourdomain.com -access_log combined #“www.yourdomain.com”更换为您的域名
DirectoryIndex index.html index.php
Options FollowSymLinks
AllowOverride All
Require all granted
保存并关闭文件。重新启动apache服务以使更改生效:
systemctl restart httpd.service
3、安装LimeSurvey
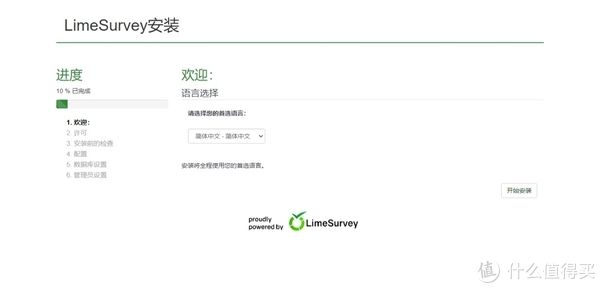
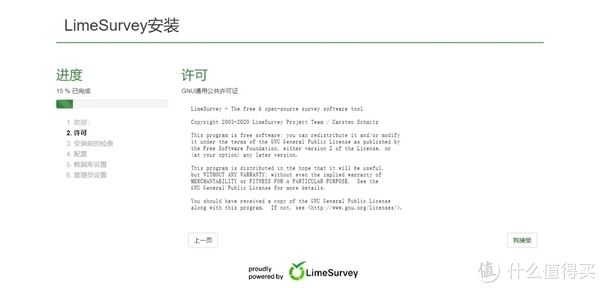
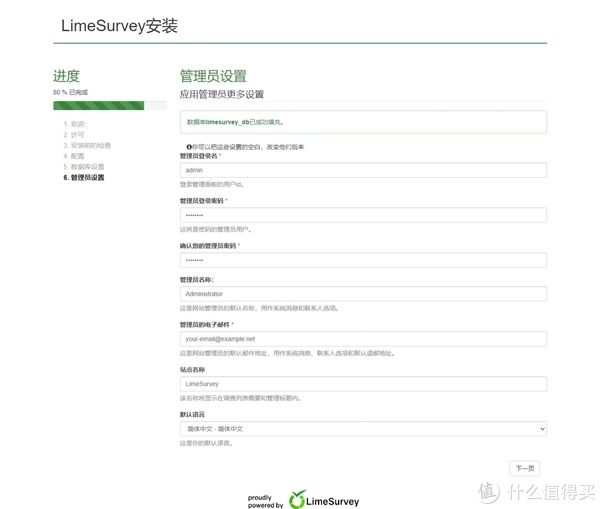
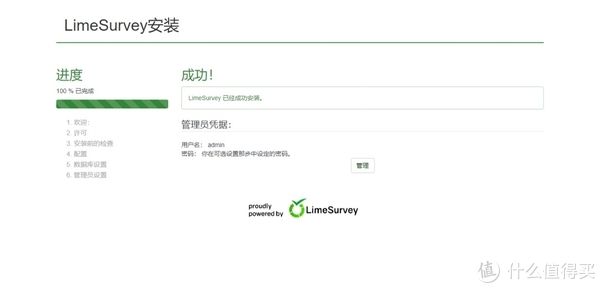
在浏览器中输入您的域名或者IP地址,开始安装LimeSurvey。


4、可能会出现的问题
安装到第3步,有可能会报错,无法继续安装,如图所示:

需要修改php.ini及php.conf两个文件:
vi /etc/php.ini
找到session.save_path,删除前面的注释符“;”,路径改为“/tmp”,如图所示:
vi /etc/httpd/conf.d/php.conf
找到session.save_path,路径改为“/tmp”,如图所示:
保存并关闭文件。重新启动apache服务以使更改生效:
systemctl restart httpd.service
在浏览器中输入您的域名或者IP地址,重新开始安装LimeSurvey。(重要)
如果还是报错,可能需要使用“reboot”命令重启系统后重试。
总结
第一次发文,难免有疏漏之处,希望大家多批评指正。希望能对学习研究的朋友有所帮助。
","force_purephv":"0","gnid":"938b52228c91e49bb","img_data":[{"flag":2,"img":[{"desc":"","height":"505","title":"","url":"https://p0.ssl.img.360kuai.com/t012e3e5496b2cb9fab.jpg","width":"600"},{"desc":"","height":"288","title":"","url":"https://p0.ssl.img.360kuai.com/t017cd9968782931bbe.jpg","width":"600"},{"desc":"","height":"288","title":"","url":"https://p0.ssl.img.360kuai.com/t01b0d7760cfbc856e9.jpg","width":"600"},{"desc":"","height":"522","title":"","url":"https://p0.ssl.img.360kuai.com/t01675c9fde03793ad6.jpg","width":"600"},{"desc":"","height":"520","title":"","url":"https://p0.ssl.img.360kuai.com/t017e2c0a884c36bcf4.jpg","width":"600"},{"desc":"","height":"288","title":"","url":"https://p0.ssl.img.360kuai.com/t013a2ed0c00ae4b5fa.jpg","width":"600"},{"desc":"","height":"509","title":"","url":"https://p0.ssl.img.360kuai.com/t01a74c56c8b93d9c83.jpg","width":"600"},{"desc":"","height":"288","title":"","url":"https://p0.ssl.img.360kuai.com/t014a6122d0f7dabad4.jpg","width":"600"},{"desc":"","height":"288","title":"","url":"https://p0.ssl.img.360kuai.com/t01de83b08cbd25c5a1.jpg","width":"600"},{"desc":"","height":"299","title":"","url":"https://p0.ssl.img.360kuai.com/t01fa38f5f1536955db.jpg","width":"554"}]}],"original":0,"pat":"art_src_1,fts0,sts0","powerby":"hbase","pub_time":1663049763000,"pure":"","rawurl":"http://zm.news.so.com/4f0b377c4a40e964d5b0fcb4643d630b","redirect":0,"rptid":"2a9bb61c286197d5","s":"t","src":"什么值得买","tag":[],"title":"从零开始,在CentOS 7上部署安装LimeSurvey
孔秋昨1072centos怎么修改root用户 -
吴蓉通13266742007 ______ 可以参考如下方法:1、添加用户,首先用adduser命令添加一个普通用户,命令如下: #adduser tommy //添加一个名为tommy的用户#passwd tommy //修改密码 Changing password for user tommy.New UNIX password: //在这里输入新密码 ...
孔秋昨1072Linux 终端下如何创建用户和设置权限? -
吴蓉通13266742007 ______ 创建用户:useradd 1.作用 useradd命令用来建立用户帐号和创建用户的起始目录,使用权限是终极用户. 2.格式 useradd [-d home] [-s shell] [-c comment] [-m [-k template]] [-f inactive] [-e expire ] [-p passwd] [-r] name 3.主要参数 -c:加上备注文字...
孔秋昨1072常用CentOSvsftpd安装设置是什?常用CentOSvsf
吴蓉通13266742007 ______ CentOS vsftpd还是比较常用的,于是我研究了一下CentOS vsftpd,在这里拿出来和大家分享一下,希望对大家有用.这里讲解介绍centos vsftpd的设置.CentOS Linux与...
孔秋昨1072如何在虚拟机上安装centos -
吴蓉通13266742007 ______ 打开虚拟机软件“VMware”,选择“创建新的虚拟机”; 2 选择“自定义(高级)”选项,点击“下一步”; 3 在“硬件兼容性”处选择最高的版本,我这里是“Workstation 10.0”,点击“下一步”; 4 选择“稍后安装操作系统”,点击“下一...
孔秋昨1072linux 创建用户useradd命令
吴蓉通13266742007 ______ 一:那个可以不创建,创建当然是非root用户了 二:useradd user1 这是最简单的加用户的命令 然后再设置下密码passwd user1这样user1这用户就可以登录了
孔秋昨1072如何管理CentOS账户
吴蓉通13266742007 ______ 作为Linux管理员,需要合理管理系统账户,包过群组的创建、密码的设置以及权限的管理等,今天小编要给大家介绍的是CentOS账户的管理,不知道如何管理的朋友可以来学习一下. Linux每个文件都分3类权限:账户本身的权限,账户所在群...
孔秋昨1072在linux中输入什么命令创建VFTP服务和怎么配置及访问 -
吴蓉通13266742007 ______ 1. 安装 使用chkconfig –list来查看是否装有vsftpd服务;使用yum命令直接安装:yum -y install vsftpd 然后为它创建日志文件:touch /var/log/vsftpd.log 这样简单的两个命令就完成了vsftp的安装,但是如果你现在想这样ftp://your_ip来访问的话,那还...
孔秋昨1072linux创建用户
吴蓉通13266742007 ______ 是这个命令,比如添加用户ABC,就是useraddABC,但是必须在root帐户下才能创建的. 创建新用户后,同时会在etc目录下的passwd文件中添加这个新用户的相关信息 .命令行窗口下可以进行用户的相互切换: 命令是su 用户名 su是switch user的缩写,表示用户切换
孔秋昨1072Linux怎么创建用户??? -
吴蓉通13266742007 ______ 直接一步到位的命令:useradd abcd && echo 123456 | passwd --stdin abcd
孔秋昨1072webmin怎么新建centos用户 -
吴蓉通13266742007 ______ useradd jack passwd jack