grub+update
作者:技术宅是我梦想
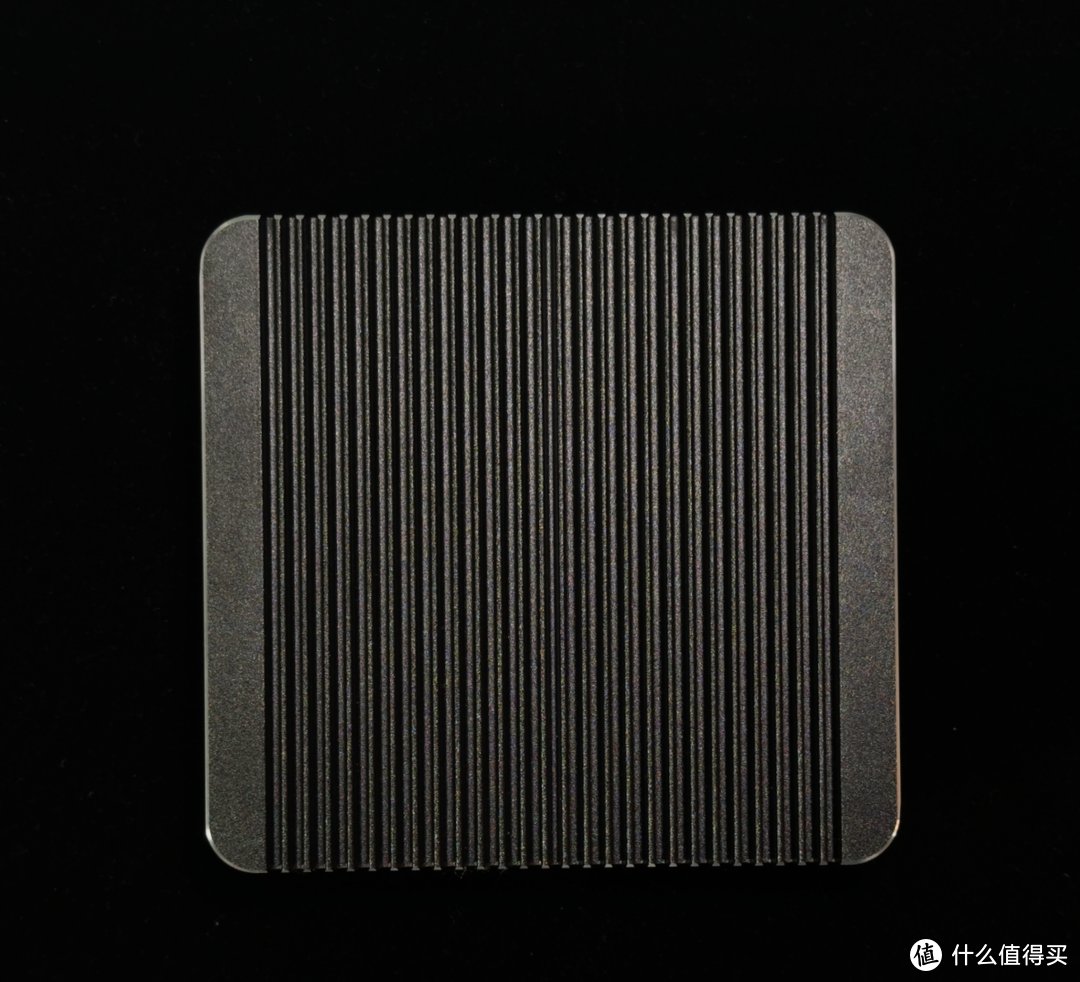
N100 玩转指南
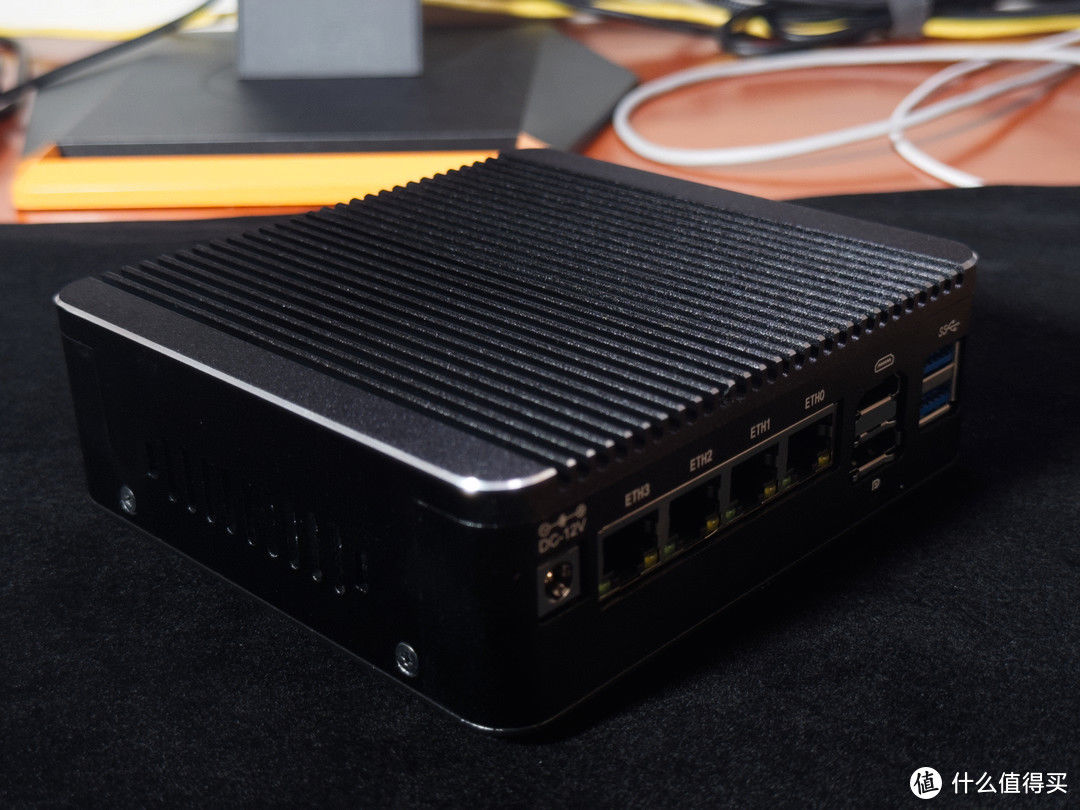
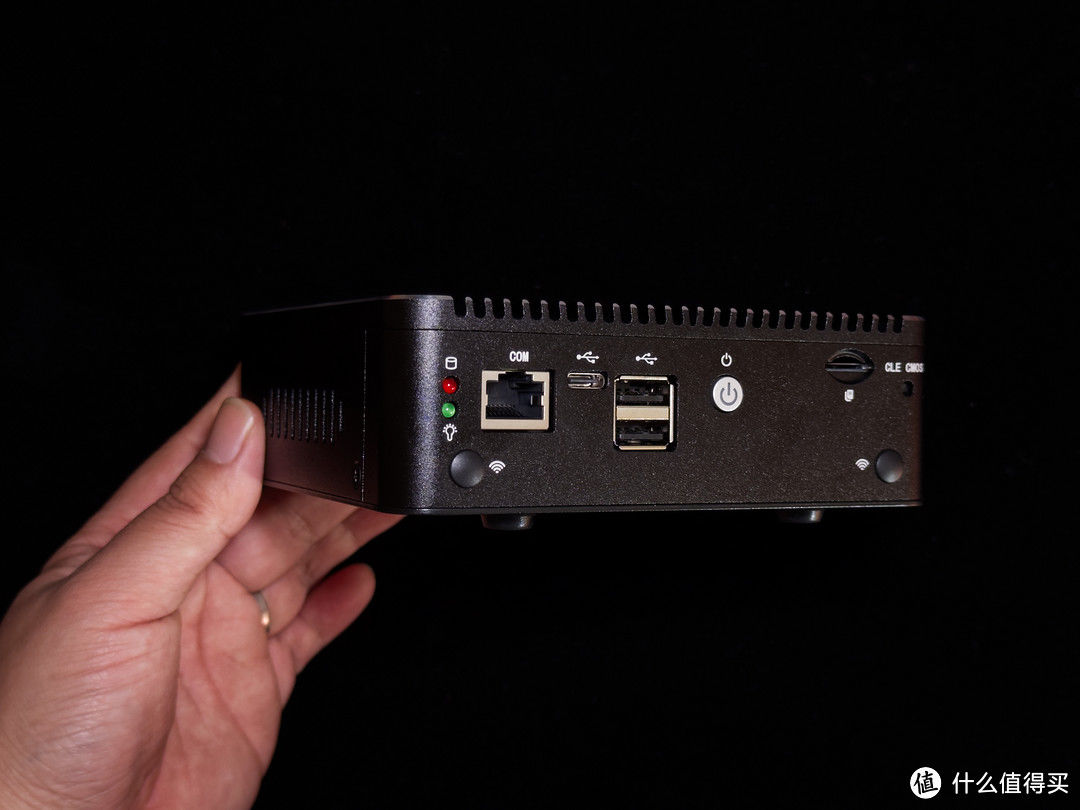
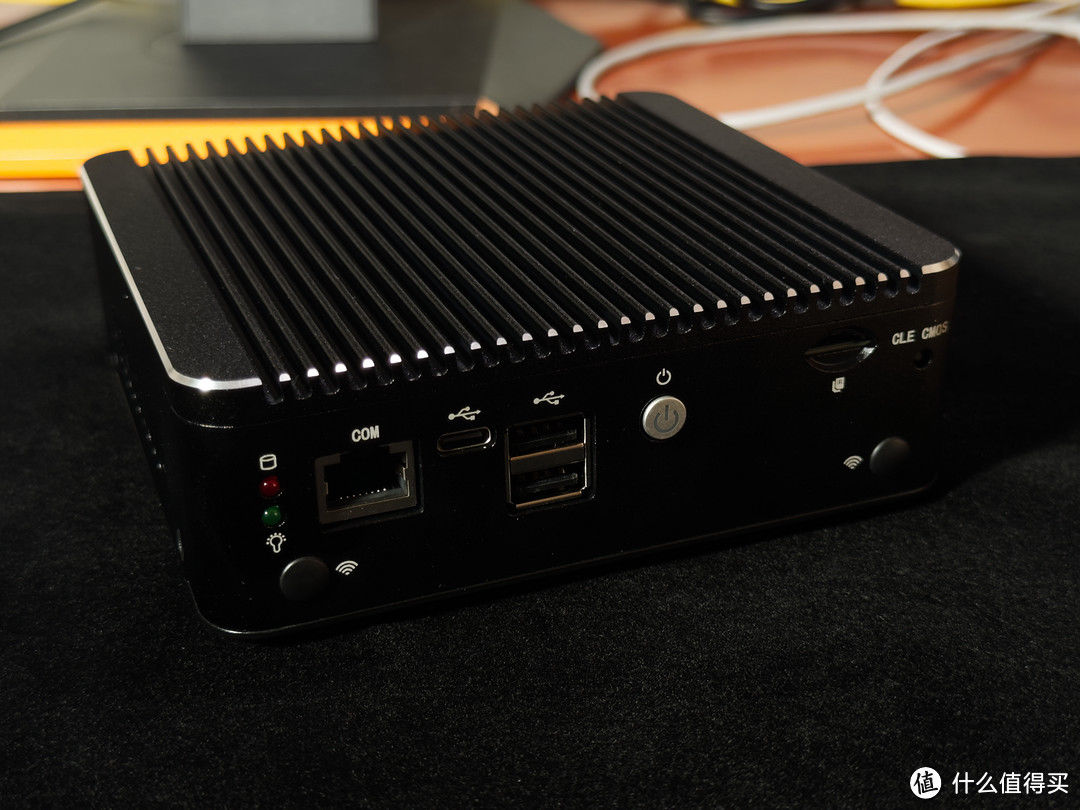
双十一通过站内链接,入手了这个性价比爆棚的N100小主机,正在折腾,所以在这里分享一下折腾经历!
安装PVE
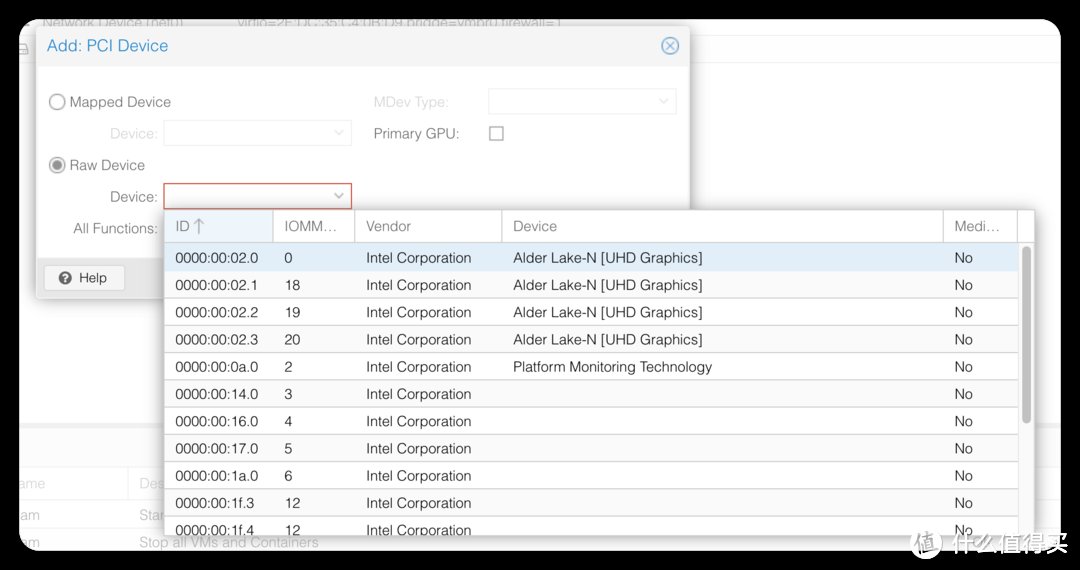
搞定硬件直通
十二代CPU的显卡 SR-IOV
安装PVE

制作安装介质
下载 PVE 最新版 iso
制作安装介质
GNU Linux
# dd bs=1M conv=fdatasync if=./proxmox-ve_*.iso of=/dev/XYZ
MacOS
打开Terminal
转换 .iso 文件到 .dmg 用这个 hdiutil
# hdiutil convert proxmox-ve_*.iso -format UDRW -o proxmox-ve_*.dmg
获取磁盘序列
# diskutil list
卸载需要写入的U盘
# diskutil list # diskutil unmountDisk /dev/diskX
dd 制作启动盘
# sudo dd if=proxmox-ve_*.dmg bs=1M of=/dev/rdiskX
Windows
用 rufus 工具
开始安装
BIOS 设置U盘启动
进入启动菜单
图形安装方式
Console安装方式
开启硬件直通

添加PVE源 apt list
echo "deb http://download.proxmox.com/debian/pve bookworm pve-no-subscription" \t\t\t>\t/etc/apt/sources.list.d/pve.list apt update
BIOS 相关设置
开启VT-d - IOMMU
VT-x
添加 kernel cmdline
Grub 设置
编辑 /etc/default/grub
GRUB_CMDLINE_LINUX_DEFAULT="quite"
GRUB_CMDLINE_LINUX_DEFAULT="intel_iommu=on iommu=pt pci_pt_e820_access=on pci=assign-busses pcie_acs_override=downstream"
kernel 内核模块设置
#!/bin/sh cat >> /etc/modules-load.d/vfio.conf << EOF vfio vfio_iommu_type1 vfio_pci vfio_virqfd EOF
添加相应参数
添加 参数到 /etc/modprobe.d/vfio.conf
echo "options vfio_iommu_type1 allow_unsafe_interrupts=1" > /etc/modprobe.d/vfio.conf
更新 grub & initramfs
# update-initramfs -u -k all # update-grub # proxmox-boot-tool refresh
检查IOMMU 是否设置成功
dmesg | grep -e DMAR -e IOMMU
输出类似如下:
[ 0.000000] Warning: PCIe ACS overrides enabled; This may allow non-IOMMU protected peer-to-peer DMA
[ 0.007697] ACPI: DMAR 0x0000000079195C18 0000A8 (v01 INTEL EDK2 00000002 01000013)
[ 0.007741] ACPI: Reserving DMAR table memory at [mem 0x79195c18-0x79195cbf]
[ 0.130354] DMAR: IOMMU enabled
[ 0.388873] DMAR: Host address width 39
[ 0.389091] DMAR: DRHD base: 0x000000fed90000 flags: 0x0
[ 0.389318] DMAR: dmar0: reg_base_addr fed90000 ver 1:0 cap 1c0000c40660462 ecap 19e2ff0505e
DMAR: IOMMU enabled 注意输出有这个就是成功了!
由于N100主机只支持 EFI启动,我遇到最大的坑就在这里
我用的是zfs文件系统,PVE在EFI启动过程使用的是systemd-boot,没有使用grub,所以上面添加 kernel cmdline的方法是不管用的,需要修改loader.conf
Systems-boot kernel cmdline 修改
修改 /etc/kernel/cmdline
# cat /etc/kernel/cmdline root=ZFS=rpool/ROOT/pve-1 boot=zfs intel_iommu=on iommu=pt pci_pt_e820_access=on pci=assign-busses pcie_acs_override=downstream,multifunction
# update-initramfs -u -k all
显卡SR-IOV
安装内核工具
apt install build-* dkms
下载内核补丁
注意:内核补丁还在测试,不建议用在生产环境
下载github源码 i915-sriov-dkms
进入下载的目录,修改PACKAGE_NAME to i915-sriov-dkms, 修改 PACKAGE_VERSION to 6.2. 保存文件。
目前PVE的内核用的是 6.2
# uname -ar Linux n100 6.2.16-3-pve #1 SMP PREEMPT_DYNAMIC PVE 6.2.16-3 (2023-06-17T05:58Z) x86_64 GNU/Linux
拷贝这个目录到 /usr/src/i915-sriov-dkms-6.2
安装dkms模块
dkms -i -m i915-sriov-dkms -v 6.2
安装 sysfsutils
echo "devices/pci0000:00/0000:00:02.0/sriov_numvfs = 7" > /etc/sysfs.conf
修改内核参数
这里vfs就是虚拟显卡的数量,最大多少我没查,这里我设置的是3。
intel_iommu=on i915.enable_guc=3 i915.max_vfs=3
grub
修改 /etc/defautl/grub 添加到 GRUB_CMDLINE_LINUX_DEFAULT="quite"这句里面
Systems-boot
我用的zfs 所以修改是这种方式
/etc/kernel/cmdline修改成
root=ZFS=rpool/ROOT/pve-1 boot=zfs intel_iommu=on iommu=pt i915.enable_guc=3 i915.max_vfs=3 pci_pt_e820_access=on pci=assign-busses pcie_acs_override=downstream,multifunction
更新内核和 initramfs
update-initramfs -u -k all
proxmox-boot-tool refresh
锁定内核
由于最新的内核没有headers提供,为了避免更新把这个内核顶了,我们要锁定目前编译好的内核!
# proxmox-boot-tool kernel pin 6.2.16-3-pve
重启
reboot
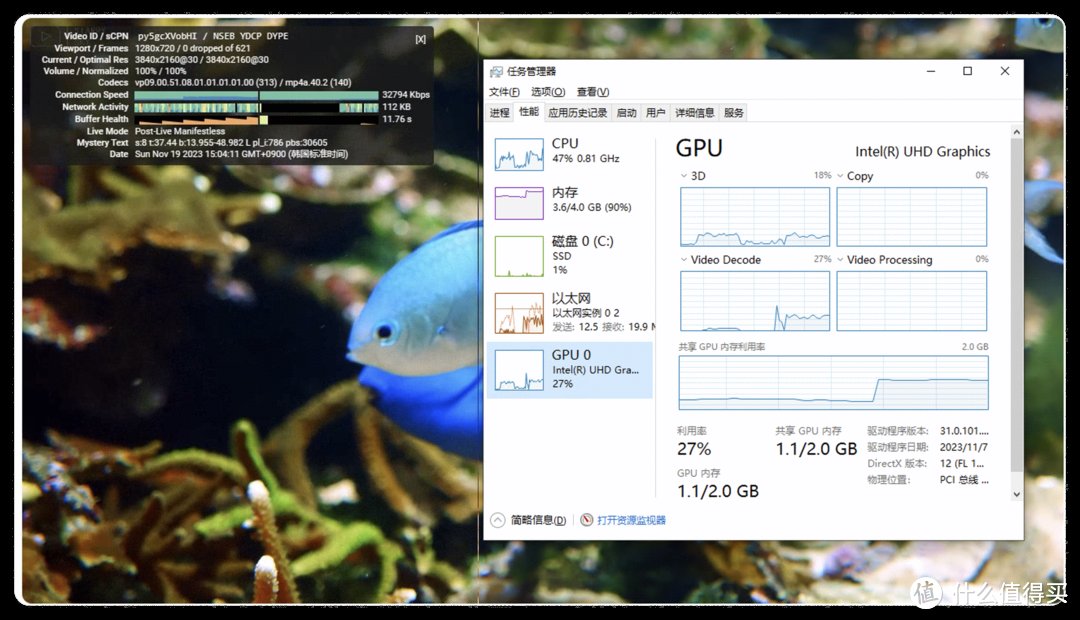
检查是否显卡 SR-IOV是否成功

lcpci | grep -i vga
输出如下,就是成功了!
00:02.0 VGA compatible controller: Intel Corporation Alder Lake-N [UHD Graphics]
00:02.1 VGA compatible controller: Intel Corporation Alder Lake-N [UHD Graphics]
00:02.2 VGA compatible controller: Intel Corporation Alder Lake-N [UHD Graphics]
00:02.3 VGA compatible controller: Intel Corporation Alder Lake-N [UHD Graphics]
或者如下输出,看到我的已经开启了3个虚拟显卡
# dmesg | grep i915
[ 0.000000] Command line: initrd=EFIproxmox6.2.16-3-pveinitrd.img-6.2.16-3-pve root=ZFS=rpool/ROOT/pve-1 boot=zfs intel_iommu=on iommu=pt i915.enable_guc=3 i915.max_vfs=3 pci_pt_e820_access=on pci=assign-busses pcie_acs_override=downstream,multifunction
[ 0.077241] Kernel command line: initrd=EFIproxmox6.2.16-3-pveinitrd.img-6.2.16-3-pve root=ZFS=rpool/ROOT/pve-1 boot=zfs intel_iommu=on iommu=pt i915.enable_guc=3 i915.max_vfs=3 pci_pt_e820_access=on pci=assign-busses pcie_acs_override=downstream,multifunction
[ 4.811959] i915 0000:00:02.0: Running in SR-IOV PF mode
[ 4.812864] i915 0000:00:02.0: [drm] VT-d active for gfx access
[ 4.813302] i915 0000:00:02.0: vgaarb: deactivate vga console
[ 4.813362] i915 0000:00:02.0: [drm] Using Transparent Hugepages
[ 4.813758] i915 0000:00:02.0: vgaarb: changed VGA decodes: olddecodes=io+mem,decodes=io+mem:owns=io+mem
[ 4.814738] mei_hdcp 0000:00:16.0-b638ab7e-94e2-4ea2-a552-d1c54b627f04: bound 0000:00:02.0 (ops i915_hdcp_component_ops [i915])
[ 4.815136] i915 0000:00:02.0: Direct firmware load for i915/adlp_dmc.bin failed with error -2
[ 4.817242] i915 0000:00:02.0: [drm] Finished loading DMC firmware i915/adlp_dmc_ver2_16.bin (v2.16)
[ 4.822141] i915 0000:00:02.0: [drm] GT0: GuC firmware i915/tgl_guc_70.bin version 70.5.1 [ 4.822154] i915 0000:00:02.0: [drm] GT0: HuC firmware i915/tgl_huc.bin version 7.9.3 [ 4.827027] i915 0000:00:02.0: [drm] GT0: HuC: authenticated for all workloads!
[ 4.827569] i915 0000:00:02.0: [drm] GT0: GUC: submission enabled
[ 4.827574] i915 0000:00:02.0: [drm] GT0: GUC: SLPC enabled
[ 4.827921] i915 0000:00:02.0: [drm] GuC RC: enabled
[ 4.828778] mei_pxp 0000:00:16.0-fbf6fcf1-96cf-4e2e-a6a6-1bab8cbe36b1: bound 0000:00:02.0 (ops i915_pxp_tee_component_ops [i915])
[ 4.828956] i915 0000:00:02.0: [drm] Protected Xe Path (PXP) protected content support initialized
[ 4.854926] [drm] Initialized i915 1.6.0 20201103 for 0000:00:02.0 on minor 0
[ 4.856871] snd_hda_intel 0000:00:1f.3: bound 0000:00:02.0 (ops i915_audio_component_bind_ops [i915])
[ 4.857105] i915 0000:00:02.0: 3 VFs could be associated with this PF
[ 4.887664] fbcon: i915drmfb (fb0) is primary device
[ 4.972789] i915 0000:00:02.0: [drm] fb0: i915drmfb frame buffer device
[ 5.638917] i915 0000:00:02.0: vgaarb: changed VGA decodes: olddecodes=io+mem,decodes=none:owns=io+mem
[ 5.639816] i915 0000:00:02.1: enabling device (0000 -> 0002)
[ 5.640648] i915 0000:00:02.1: Running in SR-IOV VF mode
[ 5.641809] i915 0000:00:02.1: [drm] GT0: GUC: interface version 0.1.0.0
[ 5.643254] i915 0000:00:02.1: [drm] VT-d active for gfx access
[ 5.644017] i915 0000:00:02.1: [drm] Using Transparent Hugepages
[ 5.645371] i915 0000:00:02.1: [drm] GT0: GUC: interface version 0.1.0.0
[ 5.646658] i915 0000:00:02.1: GuC firmware PRELOADED version 1.0 submission:SR-IOV VF
[ 5.647370] i915 0000:00:02.1: HuC firmware PRELOADED
[ 5.650198] i915 0000:00:02.1: [drm] Protected Xe Path (PXP) protected content support initialized
[ 5.650917] i915 0000:00:02.1: [drm] PMU not supported for this GPU.
[ 5.651749] [drm] Initialized i915 1.6.0 20201103 for 0000:00:02.1 on minor 1
[ 5.656497] i915 0000:00:02.0: vgaarb: changed VGA decodes: olddecodes=none,decodes=none:owns=io+mem
[ 5.657170] i915 0000:00:02.1: vgaarb: changed VGA decodes: olddecodes=io+mem,decodes=none:owns=none
[ 5.657938] i915 0000:00:02.2: enabling device (0000 -> 0002)
[ 5.658678] i915 0000:00:02.2: Running in SR-IOV VF mode
[ 5.659806] i915 0000:00:02.2: [drm] GT0: GUC: interface version 0.1.0.0
[ 5.661509] i915 0000:00:02.2: [drm] VT-d active for gfx access
[ 5.662199] i915 0000:00:02.2: [drm] Using Transparent Hugepages
[ 5.663417] i915 0000:00:02.2: [drm] GT0: GUC: interface version 0.1.0.0
[ 5.665322] i915 0000:00:02.2: GuC firmware PRELOADED version 1.0 submission:SR-IOV VF
[ 5.665956] i915 0000:00:02.2: HuC firmware PRELOADED
[ 5.668308] i915 0000:00:02.2: [drm] Protected Xe Path (PXP) protected content support initialized
[ 5.668947] i915 0000:00:02.2: [drm] PMU not supported for this GPU.
[ 5.669666] [drm] Initialized i915 1.6.0 20201103 for 0000:00:02.2 on minor 2
[ 5.673931] i915 0000:00:02.0: vgaarb: changed VGA decodes: olddecodes=none,decodes=none:owns=io+mem
[ 5.674572] i915 0000:00:02.1: vgaarb: changed VGA decodes: olddecodes=none,decodes=none:owns=none
[ 5.675219] i915 0000:00:02.2: vgaarb: changed VGA decodes: olddecodes=io+mem,decodes=none:owns=none
[ 5.675964] i915 0000:00:02.3: enabling device (0000 -> 0002)
[ 5.676640] i915 0000:00:02.3: Running in SR-IOV VF mode
[ 5.677500] i915 0000:00:02.3: [drm] GT0: GUC: interface version 0.1.0.0
[ 5.678512] i915 0000:00:02.3: [drm] VT-d active for gfx access
[ 5.679186] i915 0000:00:02.3: [drm] Using Transparent Hugepages
[ 5.680354] i915 0000:00:02.3: [drm] GT0: GUC: interface version 0.1.0.0
[ 5.681176] i915 0000:00:02.3: GuC firmware PRELOADED version 1.0 submission:SR-IOV VF
[ 5.681765] i915 0000:00:02.3: HuC firmware PRELOADED
[ 5.684137] i915 0000:00:02.3: [drm] Protected Xe Path (PXP) protected content support initialized
[ 5.684777] i915 0000:00:02.3: [drm] PMU not supported for this GPU.
[ 5.685487] [drm] Initialized i915 1.6.0 20201103 for 0000:00:02.3 on minor 3
[ 5.686338] i915 0000:00:02.0: Enabled 3 VFs
感谢阅读
虚拟机虚拟显卡搞定,下期再续!
今天就到这里了,至于虚拟机如何使用这个显卡,后续再更新!
阅读更多台式机精彩内容,可前往什么值得买查看
","gnid":"952c287ab3d94ca88","goods_list":[{"goods_channel":"天猫精选","goods_cover":"https://p0.ssl.img.360kuai.com/t012e58c7cef07acf3e.jpg?size=600x600","goods_link":"https://go.smzdm.com/96fcf5cc995906a5/ca_fz_0_0_0_0_0_0_0","goods_name":"康耐信N100软路由器整机DDR4内存4网卡I226-V2.5G无风扇低功耗迷你工控主机12代CPU支持爱快PFSENSE等包邮","goods_pos":1,"goods_price":"759"},{"goods_channel":"天猫精选","goods_cover":"https://p0.ssl.img.360kuai.com/t0151a3b1ca8862711c.jpg?size=600x600","goods_link":"https://go.smzdm.com/d3a17108db359dc8/ca_fz_0_0_0_0_0_0_0","goods_name":"康耐信intel10代N4100/J4125/N5000/N5030/4网卡I226-V2.5G网卡迷你静音软路由器小主机支持WIN10全国包邮","goods_pos":2,"goods_price":"498"},{"goods_channel":"天猫精选","goods_cover":"https://p0.ssl.img.360kuai.com/t016939ad32a3c441b6.jpg?size=600x600","goods_link":"https://go.smzdm.com/bcd47080a472504b/ca_fz_0_0_0_0_0_0_0","goods_name":"康耐信N4505/N5105/N6005软路由器整机全2.5G4网口I226-V网卡静音无风WIN10爱快串口4KNVMEM.2接口迷你电脑","goods_pos":3,"goods_price":"569"},{"goods_channel":"天猫精选","goods_cover":"https://p0.ssl.img.360kuai.com/t011080c813ec0f5f48.jpg?size=600x600","goods_link":"https://go.smzdm.com/af5467991cbf9680/ca_fz_0_0_0_0_0_0_0","goods_name":"康耐信7505/I3-1125G4/I5-1155G7/I7-1195G7软路由器整机6网卡I226全新2.5G迷你静音工控整机支持爱快ESXI等","goods_pos":4,"goods_price":"1099"}],"img_data":[{"flag":2,"img":[{"desc":"","height":810,"title":"","url":"https://p0.ssl.img.360kuai.com/t0196a97a3b4975a2c6.jpg","width":1080},{"desc":"","height":"174","title":"","url":"https://p0.ssl.img.360kuai.com/t013e7fbb3fdf77bc35.jpg","width":"1080"},{"desc":"","height":"810","title":"","url":"https://p0.ssl.img.360kuai.com/t01c8e40bbbe437d2d3.jpg","width":"1080"},{"desc":"","height":818,"title":"","url":"https://p0.ssl.img.360kuai.com/t013187791292d25cdc.jpg","width":1080},{"desc":"","height":"570","title":"","url":"https://p0.ssl.img.360kuai.com/t01d6f24c8d10062899.jpg","width":"1080"},{"desc":"","height":810,"title":"","url":"https://p0.ssl.img.360kuai.com/t015033715c0efd7adb.jpg","width":1080},{"desc":"","height":982,"title":"","url":"https://p0.ssl.img.360kuai.com/t0104909521ca32da51.jpg","width":1080},{"desc":"","height":"873","title":"","url":"https://p0.ssl.img.360kuai.com/t012b648ca433abe7e5.jpg","width":"1080"},{"desc":"","height":"620","title":"","url":"https://p0.ssl.img.360kuai.com/t01a160e1e478c5ce72.jpg","width":"1080"}]}],"original":0,"pat":"art_src_1,fts0,sts0","powerby":"pika","pub_time":1700461083000,"pure":"","rawurl":"http://zm.news.so.com/05d2c58883fa73a41e13e9cf226ebb04","redirect":0,"rptid":"dcc8550010631520","rss_ext":[],"s":"t","src":"什么值得买","tag":[{"clk":"kdigital_1:显卡","k":"显卡","u":""}],"title":"pve 记录 篇四:康耐信N100小主机玩转指南,显卡SR-IOV
衡友堂3566ubuntu 10.04更新源 正在设定 grub - pc 下面该怎么操作 -
赫畏谢13261298691 ______ 没具体要求的话直接点下一步; 不想用Grub2的话选下拉菜单中default
衡友堂3566在原Ubuntu 基础上重装Ubuntu可最后总显示 “executing 'grub - install /dev/sdb' failed”不知为何? -
赫畏谢13261298691 ______ 你在选择硬盘分区的时候,最下面有一个grub安装选择,默认是U盘,你改成硬盘就可以了....
衡友堂3566press+space+to+stare+grub+any+other+keyto+boot+previous+mbr如何进入系统
赫畏谢13261298691 ______ 按空格键进入grub菜单,其它键进入主引导记录,通常就敲敲回车能进.
衡友堂3566根据B表更新A表的数据,怎么写SQL -
赫畏谢13261298691 ______ 不同数据库管理系统,具体的SQL写法是有差别的. 以Oracle为例: update table_a a--更新table_a表 set(a.col_a,a.col_b)=--更新列,只一列不用括号 (select b.col_a,b.col_b from table_b b where b.rel=a.rel)--用来更新的数据,可以是单表,也可以是多表 where a.col_a is null--被更新的数据子集的限制条件,如果是全表更新,无此子句 ;
衡友堂3566如何用job+存储过程实现oracle数据库增量更新 -
赫畏谢13261298691 ______ Oracle增量更新有两种方式:1、日志方式的记录,由RMAN设置增量方式完成更新;2、由SQL语句实现更新. 你的“job+存储过程”的实现应该是SQL语句方式,应该完成:去重-插入两个动作.
衡友堂3566ubuntu 的grub - pc是什么 -
赫畏谢13261298691 ______ GNU GRUB(简称“GRUB”)是一个来自GNU项目的多操作系统启动程序.GRUB是多启动规范的实现,它允许用户可以在计算机内同时拥有多个操作系统,并在计算机启动时选择希望运行的操作系统.GRUB可用于选择操作系统分区上的不同内核,也可用于向这些内核传递启动参数.
衡友堂3566无法将grub - efi软件包安装到是怎么回事
赫畏谢13261298691 ______ 电脑出现grub问题开不了机,建议如下: 按F5跳过检索,建议开机后用百度卫士全面体检电脑 这个是硬盘读取问题,正常的,有时候电脑硬盘会出现 如果以上方法无效或者开不了机,建议修复引导boot或者重装系统.
衡友堂3566grub - efi - amd64 - signed安装失败,怎么解决 -
赫畏谢13261298691 ______ 谷歌发现说问题现windowsubuntu及grub2引导木关系堆英文说nomodeset关解决linux公社说2.添加nomodeset安装完毕重启,仍启,需要编辑启命令1)键入e2)splash添加nomodeset(注意:单词间用空格间隔)3)Ctrl+X便进入系统lz试试我没遇知道行行
衡友堂3566SQL Server如何通过比较B表数据更新A表数据? -
赫畏谢13261298691 ______ 如果B表的ID是递增排序,且等级根据ID的大小排序,则可以用以下语句更新:update a set a.grade=(select top(1) b.grade from B b where b.NO=a.NO order by ID DESC),a.name=(select top(1) b.name from B b where b.NO=a.NO order by ID DESC) from A a
衡友堂3566两张表A、B,现在要把A表的a字段,全部更新到B表的b字段,两个表有共同字段C,请问这个update语句怎么写 -
赫畏谢13261298691 ______ 楼主这语句有bug,这种修改如果在B表中的数据在A表中没有就会把B表的这些数据改为空,若原来是空的还好,若不是空的就相当于把数据删除了,这是其一.根据你说的报查询返回多行来看,是出现了在a表中的c字段的值有重复,该更新为...