pwm温控风扇怎么接
作者:非著名坐家
某种原因导致目前畅网第四版n5105性价比爆棚,比第三版改变不大,也不用期待226比225网卡优秀多少,但数码界流行买新不买旧的道理,因此就和朋友一起趁多多摇到100的优惠就入了第四版n5105实惠版,在此顺道再次感谢朋友军军。
总体而言升级不大,但带来性能升级很明显,而且带来一个系统上优化的槽点,pwm温控形同虚设,(厂家在bios里写死了32度-40度的pwm温控参数,n5105发热不小基本40度-45度之间徘徊,通过pdd商家客服工程师反馈了下厂家人家根本不睬)。这也是本篇水一文,在其他地方找不到的如何在系统层面优化pwm风扇。(本篇基于proxmox ve 7.2,其他环境请自行参考编译与测试)
物理位置
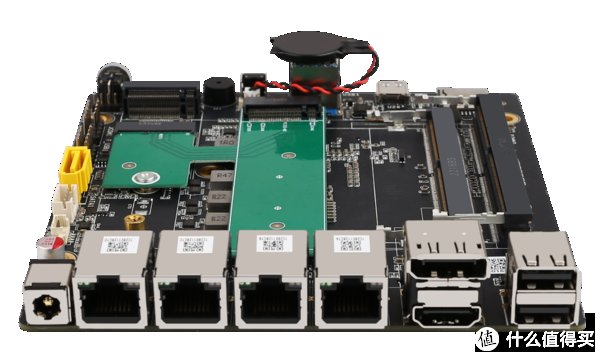
pwm四针温控位置在主板sata供电口旁边(图片左侧黄色sata的旁边sata供电口的旁边)
基本原理
https://wiki.archlinux.org/index.php?title=Fan_speed_control
参考这个wiki觉得基本可以通用可行,于是上手准备开干。
想必各位使用pve的朋友都安装了lm-sensors用于网页端监控传感器问题。如果没有的朋友可以通过下面命令安装
apt install lm-sensers
\n
实验前查看pwm风扇转速1288
通过命令sensors可以查看最终效果,(it8613就是文章核心,位于南桥的温控芯片包含pwm控制,默认大家可能没有这一项,可以参考下一章需要先编译下加载支持)
root@pve:~# sensors
it8613-isa-0a30
Adapter: ISA adapter
CPU Fan: 1288 RPM (min = 0 RPM)
CPU Temp: +36.0C (low = -128.0C, high = +127.0C) sensor = thermistor
MB Temp: +38.0C (low = -128.0C, high = +127.0C) sensor = thermistor
PCH Temp: +38.0C (low = -128.0C, high = +127.0C)
acpitz-acpi-0
Adapter: ACPI interface
temp1: +45.0C (crit = +119.0C)
coretemp-isa-0000
Adapter: ISA adapter
Package id 0: +41.0C (high = +105.0C, crit = +105.0C)
Core 0: +37.0C (high = +105.0C, crit = +105.0C)
Core 1: +37.0C (high = +105.0C, crit = +105.0C)
Core 2: +37.0C (high = +105.0C, crit = +105.0C)
Core 3: +37.0C (high = +105.0C, crit = +105.0C)
nvme-pci-0100
Adapter: PCI adapter
Composite: +32.9C (low = -273.1C, high = +82.8C)
(crit = +84.8C)
编译支持it8613
参考如下项目github的a1wong(由于大妈限制说不让发github或百度网盘之类的网络连接所以再次欠奉,后续连接奉上或者自行去github的a1wong的it87项目下载下来)
解压后,make安装
cd it87/
make clean
*注:make命令可能这一步会报少一些预加载项,如下安装:
apt update -y
apt -y install dkms make gcc
apt -y install build-essential
apt -y install libelf-dev
根据自己的系统版本号来安装头文件
uname -r
apt search 5.15.39-4
apt install pve-headers-5.15.39-4-pve
然后就可以继续make clean
make
make install
modprobe it87
通过sensors-detect来加载it8613
sensors-detect
sensors
lsmod |grep it87
优化pwmconfig
root@pve:~# pwmconfig
#pwmconfig version 3.6.0
This program will search your sensors for pulse width modulation (pwm)
controls, and test each one to see if it controls a fan on
your motherboard. Note that many motherboards do not have pwm
circuitry installed, even if your sensor chip supports pwm.
We will attempt to briefly stop each fan using the pwm controls.
The program will attempt to restore each fan to full speed
after testing. However, it is ** very important ** that you
physically verify that the fans have been to full speed
after the program has completed.
Found the following devices:
hwmon0 is acpitz
hwmon1 is nvme
hwmon2 is it8613
hwmon3 is coretemp
Found the following PWM controls:
hwmon2/pwm2 current value: 255
hwmon2/pwm3 current value: 255
hwmon2/pwm4 current value: 255
hwmon2/pwm5 current value: 255
Giving the fans some time to reach full speed...
Found the following fan sensors:
hwmon2/fan2_input current speed: 1869 RPM
hwmon2/fan3_input current speed: 0 ... skipping!
Warning!!! This program will stop your fans, one at a time,
for approximately 5 seconds each!!!
This may cause your processor temperature to rise!!!
If you do not want to do this hit control-C now!!!
Hit return to continue:
Testing pwm control hwmon2/pwm2 ...
hwmon2/fan2_input ... speed was 1869 now 0
It appears that fan hwmon2/fan2_input
is controlled by pwm hwmon2/pwm2
Would you like to generate a detailed correlation (y)? n
Testing pwm control hwmon2/pwm3 ...
hwmon2/fan2_input ... speed was 1869 now 1869
no correlation
No correlations were detected.
There is either no fan connected to the output of hwmon2/pwm3,
or the connected fan has no rpm-signal connected to one of
the tested fan sensors. (Note: not all motherboards have
the pwm outputs connected to the fan connectors,
check out the hardware database on http://www.almico.com/forumindex.php)
Did you see/hear a fan stopping during the above test (n)? n
Testing pwm control hwmon2/pwm4 ...
hwmon2/fan2_input ... speed was 1869 now 1869
no correlation
No correlations were detected.
There is either no fan connected to the output of hwmon2/pwm4,
or the connected fan has no rpm-signal connected to one of
the tested fan sensors. (Note: not all motherboards have
the pwm outputs connected to the fan connectors,
check out the hardware database on http://www.almico.com/forumindex.php)
Did you see/hear a fan stopping during the above test (n)? n
Testing pwm control hwmon2/pwm5 ...
hwmon2/fan2_input ... speed was 1869 now 1869
no correlation
No correlations were detected.
There is either no fan connected to the output of hwmon2/pwm5,
or the connected fan has no rpm-signal connected to one of
the tested fan sensors. (Note: not all motherboards have
the pwm outputs connected to the fan connectors,
check out the hardware database on http://www.almico.com/forumindex.php)
Did you see/hear a fan stopping during the above test (n)? n
Testing is complete.
Please verify that all fans have returned to their normal speed.
The fancontrol script can automatically respond to temperature changes
of your system by changing fanspeeds.
Do you want to set up its configuration file now (y)?
What should be the path to your fancontrol config file (/etc/fancontrol)?
Loading configuration from /etc/fancontrol ...
Select fan output to configure, or other action:
1) hwmon2/pwm2
2) Change INTERVAL
3) Just quit
4) Save and quit
5) Show configuration
select (1-n): 1
Devices:
hwmon0 is acpitz
hwmon1 is nvme
hwmon2 is it8613
hwmon3 is coretemp
Current temperature readings are as follows:
hwmon0/temp1_input 45
hwmon1/temp1_input 33
hwmon2/temp1_input 36
hwmon2/temp2_input 38
hwmon2/temp3_input 38
hwmon3/temp1_input 42
hwmon3/temp2_input 39
hwmon3/temp3_input 38
hwmon3/temp4_input 39
hwmon3/temp5_input 38
Select a temperature sensor as source for hwmon2/pwm2:
1) hwmon0/temp1_input 7) hwmon3/temp2_input
2) hwmon1/temp1_input 8) hwmon3/temp3_input
3) hwmon2/temp1_input 9) hwmon3/temp4_input
4) hwmon2/temp2_input 10) hwmon3/temp5_input
5) hwmon2/temp3_input 11) None (Do not affect this PWM output)
6) hwmon3/temp1_input
select (1-n): 6
Enter the low temperature (degree C)
below which the fan should spin at minimum speed (20): 40
Enter the high temperature (degree C)
over which the fan should spin at maximum speed (60): 50
Enter the minimum PWM value (0-255)
at which the fan STOPS spinning (press t to test) (100): t
Now we decrease the PWM value to figure out the lowest usable value.
(每个人的风扇型号不一样,这里可能会有差异,我的是12cm猫扇)
We will use a slightly greater value as the minimum speed.
PWM 255 -> 1864 RPM
PWM 240 -> 1790 RPM
PWM 225 -> 1695 RPM
PWM 210 -> 1595 RPM
PWM 195 -> 1500 RPM
PWM 180 -> 1394 RPM
PWM 165 -> 1288 RPM
PWM 150 -> 1188 RPM
PWM 135 -> 1090 RPM
PWM 120 -> 971 RPM
PWM 105 -> 853 RPM
PWM 90 -> 732 RPM
PWM 75 -> 622 RPM
PWM 60 -> 482 RPM
PWM 45 -> 350 RPM
PWM 30 -> 201 RPM
PWM 28 -> 153 RPM
PWM 26 -> 0 RPM
OK, using 30
Enter the minimum PWM value (30-255)
at which the fan STARTS spinning (press t to test) (150): 40
Enter the PWM value (0-30) to use when the temperature
is below the low temperature limit (0):
Enter the PWM value (30-255) to use when the temperature
is over the high temperature limit (255):
Select fan output to configure, or other action:
1) hwmon2/pwm2
2) Change INTERVAL
3) Just quit
4) Save and quit
5) Show configuration
select (1-n): 4
Saving configuration to /etc/fancontrol...
Configuration saved
root@pve:~# vi /etc/fancontrol
root@pve:~# /etc/init.d/fancontrol restart
Restarting fancontrol (via systemctl): fancontrol.service.
再次查看pwm风扇783
root@pve:~# sensors
it8613-isa-0a30
Adapter: ISA adapter
CPU Fan: 783 RPM (min = 0 RPM)
CPU Temp: +36.0C (low = -128.0C, high = +127.0C) sensor = thermistor
MB Temp: +39.0C (low = -128.0C, high = +127.0C) sensor = thermistor
PCH Temp: +39.0C (low = -128.0C, high = +127.0C)
acpitz-acpi-0
Adapter: ACPI interface
temp1: +45.0C (crit = +119.0C)
coretemp-isa-0000
Adapter: ISA adapter
Package id 0: +41.0C (high = +105.0C, crit = +105.0C)
Core 0: +38.0C (high = +105.0C, crit = +105.0C)
Core 1: +38.0C (high = +105.0C, crit = +105.0C)
Core 2: +38.0C (high = +105.0C, crit = +105.0C)
Core 3: +38.0C (high = +105.0C, crit = +105.0C)
nvme-pci-0100
Adapter: PCI adapter
Composite: +33.9C (low = -273.1C, high = +82.8C)
(crit = +84.8C)
总结
这样猫扇真的很安静,偶尔docker的qinglong大批量运行上升到50度才会转速上升有声音。
后记:闲来无事偶作一篇仅供各位参考。如果本篇能够帮助大家或厂家,欢迎自愿打赏,谢谢。
\n
吕秦韩577电脑主板cpu插头 - cpu电源插头
堵薇砌19250457336 ______ 1. cpu电源插头是通用的,但是电源也在发展,过去的时候主板供电是20PIN,现在... 从而达到控制风扇转速的目的. RPM的双重智能型风扇(温控+PWM),也就是4PIN...
吕秦韩577PWM扇子可以分开接线不??? -
堵薇砌19250457336 ______ 可以试试!~我弄过,不过是3pin的,不过我把全部线都接到电源线上面了
吕秦韩577电脑cpu风扇电源怎么插 - cpu风扇的电源线怎么插
堵薇砌19250457336 ______ cpu风扇的电源线怎么插您只要将4针插头拔掉,把新买的这个3针插头插入CPU_FAN处即可,如果风扇不转换另外3个针就可以了,放心用吧.主板cpu风扇电源线插哪里1...
吕秦韩577机箱风扇集线器上的PWM接口 接在主板哪个接口上比较合适啊 -
堵薇砌19250457336 ______ 如果是CPU的风扇 是插在主板上的 一般都是3针或4针 如果是机箱内部的风扇 是直接串联在电源上的 一般都是4针的类似长方,有一面试弧形的插头 记得别串到硬盘的电源上 一般 串联到光驱或者其他设备
吕秦韩577为什么电脑主机风扇是四线的,分别是什么线 -
堵薇砌19250457336 ______ 四线风扇连接线颜色定义如下: CPU风扇4 Pin接口,主板能通过这多出来的一根pin脚来控制12V的风扇供电,从而达到控制风扇转速的目的. RPM的双重智能型风扇(温控+PWM),也就是4PIN插头的因为没有PWM功能,4PIN风扇若插在...
吕秦韩577水冷三根线往哪插电脑主板(水冷的3pin插在主板哪)
堵薇砌19250457336 ______ 1. 水冷的3pin插在主板哪一体水冷水泵供电线按以下方式插:找3pin的主板风扇接口,这些风扇口一般都在主板的边缘,但是不要插到CPU风扇上面,CPU风扇口一定要插...
吕秦韩577四线的电脑主机风扇是什么样子?
堵薇砌19250457336 ______ CPU风扇4 Pin接口,主板能通过这多出来的一根pin脚来控制12V的风扇供电,从而达到控制风扇转速的目的. RPM的双重智能型风扇(温控+PWM),也就是4PIN插头的因为没有PWM功能,4PIN风扇若插在3PIN主板上只能默认在最低转速运行,在第四条线上接上一个5V电压即可.或者将4PIN插座内12V接头与PWM信号线短接(PWM通常情况下为第四条蓝色线)即能让这扇子全速工作. 3PIN风扇可以直接用在主板4PIN插座上,但主板原有的风扇调速功能没有了,若主板支持BIOS调速则设置成DC即可.有的主板可能每次开机都会提示CPU风扇没插好,需要进入BIOS将“风扇监控”选项关闭.我的电脑就是这样的,希望这些信息能给你提供帮助!
吕秦韩577电脑的这四条线要连接吗? -
堵薇砌19250457336 ______ 黑色的 硬盘电源线 (SATA接口) 你要接上你的硬盘或光驱 第二条 和第三条一样 老式IDE硬盘或光驱 你应该用不上 最下面那个是软驱或读卡器的电源 你也用不上 去插第一条吧
吕秦韩577电脑主板4条电源线原理(电脑主板四根线分别是什么)
堵薇砌19250457336 ______ 1. 电脑主板四根线分别是什么1、主板里面的两根线一根是主板和硬盘的数据线,另... (Pulse Width Modulation脉宽调制)智能温控风扇的PWM信号线.5. 主板上四针是什...
吕秦韩577电脑风扇四条线(电脑风扇四条线定义)
堵薇砌19250457336 ______ 1. 电脑风扇四条线定义一根是地,二根是供电,另外两根一根是温控,一根是转速感应.将那两根供电的线分别接在正负极上风扇就可以转了,另外两根是需要主板支持的...